28 August 2009

Ray, again, and again, and...

The set subject for the Melbourne Camera Club August 2009 EDI (Electronically Displayed Image) competition was "Abstract", and as an abstract concept I thought of manipulating the image of Ray that I had taken. I am pleased to say it won a "Commended" award, as well as getting a good reaction from the audience:

(Click on it to see a larger copy.)

I have since been asked how I created that image, and invited to give a talk on that at a future meeting of the MCC Digital Group. So here, briefly, is what I did.

Starting with the photo of Ray, I loaded it into GIMP and copied it on to a new layer with a transparent background. I then used the eraser tool to wipe away all the black background, and also Ray's coat and shirt so I was just left with his face and neck, the rest of the image being transparent.

I then used a random number generator to come up with 20 different image scale and rotation amounts. I applied each scale and rotation, and copied the image into a new layer of my working image.

I sorted the layers so that the larger scale copies were at the back, and the smaller ones at the front. This gives the image more complexity - if a large copy was at the front, then it would hide the smaller ones. I then moved the images around by hand until they were in aesthetically pleasing locations.

One final complication was that using the order of layers did not always give the exact look I wanted. For example, if you look at the bottom of the image just to the right of centre, you will see three copies (let's call them A, B, and C). Note that A is in front of B, B is in front of C, and C is in front of A. This can not be achieved with simple layering.

So to do this, I used layer masks. A is in fact in front of B & C, but to make it appear to be behind C, I apply a layer mask to A. Then in layer C I selected all the transparent section, and applied that selection to the layer mask of A (using some manipulations that I won't go into the detail of here). Thus, the only parts of copy A that show are the parts that are transparent in copy C, thus A appears obscured by C, and hence behind C.

22 August 2009

Ray - construction of a photo

Hmm, been too long since I wrote. So here is a short note about a recent photo, since I had a few questions about how it was created.


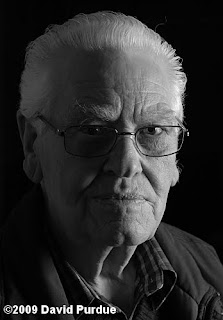
Photo of Ray Huntley by David Purdue

This is a photo of Ray Huntly, who coordinates all the photo competitions at the Melbourne Camera Club. The photo was taken during a meeting of the Digital Group - I was presenting a talk on GIMP, and needed a photo to manipulate to illustrate the discussion, so took this one.

Now, the people there saw me take the photo, so they knew exactly the lighting set up I used, but I still ended up spending 5-10 minutes explaining why the photo looks like it does.

The lighting set up was quite simple - one flash firing into a reflective umbrella off to camera right.

The two main questions that arose were:

  1. Since there was only one light, why is the left side (as we look at the photo) not in darkness?
  2. There was quite a bit of ambient light in the room, why is the background totally black?

The answers are a little bit related: if there was enough ambient light to avoid darkness on the left side of the photo, why was there not enough for us to see the room Ray is standing in?

To look at the first one first - I had carefully placed the set up next to a wall off to camera left (a wall that happens to have light coloured canvas on for mounting pictures for competitions and exhibitions). The flash on camera right hit the wall, and the soft covering on the wall reflected it back to light camera left. Obviously, it is dimmer than the direct light, but provides enough light to avoid very dark shadows on that side of the photo. Also note that the reflection comes from a large area of the wall, so the light is quite soft.

As for the background... The photo was taken at a relatively fast shutter speed (1/200 sec), and the flash was relatively much brighter than the ambient light in the room. Combine that with the fact I was using a reflective rather than shoot through umbrella, so I was able to direct the light where I wanted it without too much spilling in to the rest of the room. At that shutter speed there was not enough time for the ambient light to make any impression on my camera's sensor.

Thanks to David Gilliver, who explained the concept of lighting zones to me. That is essentially what is at work here: there is the foreground zone, where the light from the flash is contained, and the background zone, which has light in it, but not enough relative to the foreground zone to register.

Addendum - this photo won a "Highly Commended" award in the Melbourne Camera Club August 2009 EDI competition.